 Dylan Auty
 Setup Guide
Auto-Configure (Recommended)
1. Create the Root GameObject
VehicleRoot (Rigidbody + OffroadVehicle)- Create an empty GameObject
- Add a
Rigidbodycomponent - Add the
OffroadVehiclecomponent — it auto-addsOffroadInputSystemif noOffroadInputcomponent exists
2. Run the Wizard
Prefab Note: If the root GameObject or any of its children (body, wheels) come from a prefab, unpack the prefab first (right-click in the Hierarchy > Prefab > Unpack). The wizard re-parents scene objects and creates new children — this breaks prefab connections. Unpack before running the wizard.
In the OffroadVehicle inspector, click Auto-Configure.
Step 1: Body (Optional)
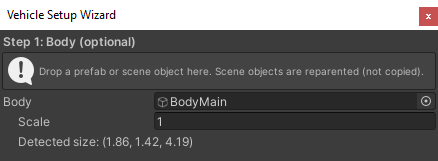
- Drop a body mesh (prefab or scene object) into the Body field
- Scene objects are reparented (not copied); prefabs are instantiated
- The body receives a
BoxCollideronly if no colliders already exist - All body renderers are set to the Ignore Raycast layer (so the suspension raycasts pass through)
- Adjust Scale if needed
Step 2: Wheel Selection
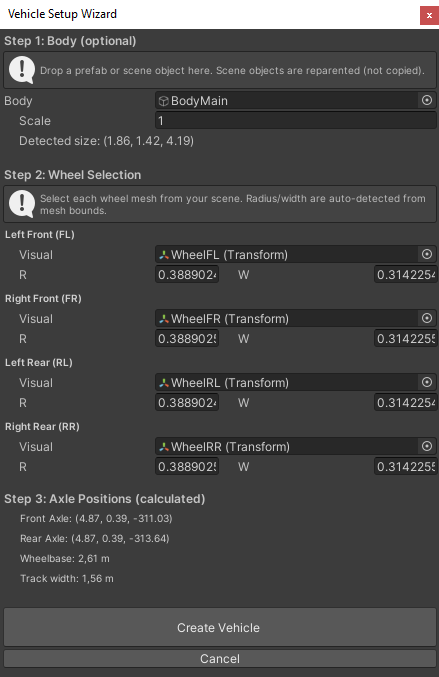
- Assign all 4 wheel meshes — Left Front, Right Front, Left Rear, Right Rear
- Radius and width are auto-detected from mesh bounds
- The middle dimension becomes the radius
- The smallest dimension becomes the width
- Manual overrides are available
Step 3: Axle Positions
The wizard calculates:
- Front Axle — midpoint between the two front wheel positions
- Rear Axle — midpoint between the two rear wheel positions
- Wheelbase — distance between front and rear axles
- Track Width — average of front and rear track widths
Create Vehicle
Click Create Vehicle — the wizard creates:
| Created Item | Details |
|---|---|
| FrontAxle | SolidAxle with FrontWheel + RearWheel OffroadWheel children |
| RearAxle | SolidAxle with OffroadWheel children |
| OffroadWheel (×4) | Per-wheel components with preset radius/width |
| Wheel Pivot | Per-wheel pivot transform for spin + steer rotation |
| CenterOfMass | Empty transform positioned low (60% of half-height below body center) |
| Body | Reparented or instantiated with BoxCollider if needed |
3. Configure the Vehicle
After wizard setup, configure the OffroadVehicle in the inspector:
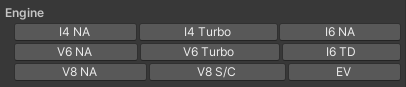
Engine Presets
| Preset | Max Torque | Max RPM | Idle RPM | Character |
|---|---|---|---|---|
| V8 | 650 Nm | 5,500 | 750 | Diesel-like low-end torque, 60% at idle |
| V6 | 500 Nm | 6,500 | 800 | Balanced, builds from 30% at idle |
| I4 | 400 Nm | 7,500 | 850 | Peak at high RPM, 15% at idle |
| I6 | 550 Nm | 6,000 | 800 | Broad flat curve, 40% at idle |

Transmission Presets
| Preset | Ratios | Final Drive |
|---|---|---|
| 4-Speed | 4.0 / 2.5 / 1.7 / 1.0 | 4.1 |
| 5-Speed | 4.0 / 2.5 / 1.7 / 1.2 / 0.9 | 4.1 |
| 6-Speed | 4.0 / 2.5 / 1.7 / 1.3 / 1.0 / 0.8 | 3.9 |
Vehicle Presets
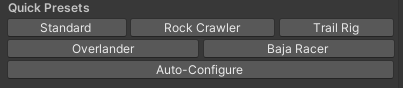
One-click buttons that set weight, engine, transmission, suspension, differential, and aerodynamics:
| Preset | Weight | Wheels | Suspension | Diff | Best For |
|---|---|---|---|---|---|
| Rock Crawler | 2,400 kg | 5.5 / 3.5 / 2.2 / 1.5 / 1.0 × 5.3 (×2.0 LO) | 0.6m ride, 0.5m travel, 42k spring | Locked | Technical rock crawling |
| Trail Rig | 2,000 kg | 5.0 / 2.8 / 1.8 / 1.3 / 1.0 × 4.1 (×2.0 LO) | 0.5m ride, 0.36m travel, 49k spring | LimitedSlip | General offroad |
| Overlander | 3,200 kg | 5.0 / 3.0 / 2.0 / 1.4 / 1.0 × 4.5 (×2.0 LO) | 0.55m ride, 0.4m travel, 70k spring | Locked | Heavy expedition |
| Baja Racer | 1,800 kg | 4.0 / 2.2 / 1.6 / 1.2 / 0.9 × 3.7 (×2.0 LO) | 0.6m ride, 0.6m travel, 26k spring | Open | High-speed desert |
4. Configure Each Axle
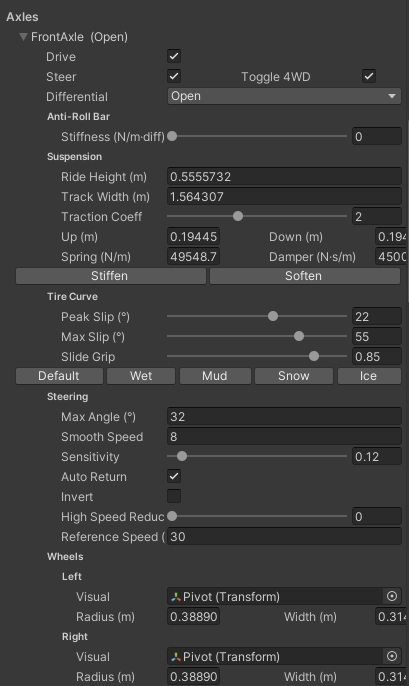
Each SolidAxle has these per-axle settings:
| Setting | Description |
|---|---|
| Drive | Axle receives engine torque |
| Steer | Wheels on this axle steer |
| Differential | Open, Locked, or LimitedSlip |
| Ride Height (m) | Distance from axle center to wheel center at rest |
| Travel Up (m) | How far the wheel compresses from rest (bump travel) |
| Travel Down (m) | How far the wheel droops from rest |
| Spring Rate (N/m) | Suspension stiffness |
| Damper Rate (N·s/m) | Suspension damping |
| Track Width (m) | Distance between left and right wheel centers |
| Traction Coefficient | Friction multiplier (1.2 = 20% more grip) |
| Cornering Coefficient | Slip-angle stiffness (5–15 typical). Higher = more lateral force. |
| Max Steer Angle (°) | Maximum steering angle (steerable only) |
| Steer Smooth Speed | Base response speed for steering |
| Sensitivity | 0–2. Multiplier on steering response. Lower = less twitchy. |
| Auto Return | On: steering returns to center. Off: holds last position (manual return). |
| Invert Steer | Flip steering direction for this axle |
| Force Response | Lateral force build rate (1 = slow, 10 = instant) |
| High Speed Reduction | 0–1. Reduces steering angle at high speed (arcade feel). 0 = off. |
| Reference Speed (m/s) | Speed at which High Speed Reduction reaches full effect |
Stiffen/Soften buttons multiply both spring and damper rates by 1.2× / ÷1.2.
5. Add Effects (Optional)
Add OffroadEffects to each wheel GameObject:
- Create an
AudioSourcewith a tire squeal loop clip on each wheel - Assign it to Tire Squeal Source
- Optionally assign a Skidmark Material and Tire Smoke ParticleSystem
- Skidmarks auto-create TrailRenderers at runtime
6. Add Audio
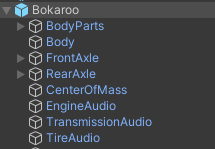
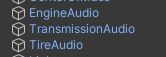
Add OffroadAudio to the root GameObject:
- Create an
AudioSourcefor idle engine sound (assign a clip) - Create an
AudioSourcefor running engine sound (assign a clip) - Assign both to
OffroadAudio
7. Install the Input System Package
This asset uses Unity's New Input System (com.unity.inputsystem).
- Open Window > Package Manager
- Search for Input System and click Install
- When prompted to enable the new input backend, click Yes and let Unity restart
Once installed, the OffroadInputSystem component is enabled by #if ENABLE_INPUT_SYSTEM.
8. Create an Input Action Asset
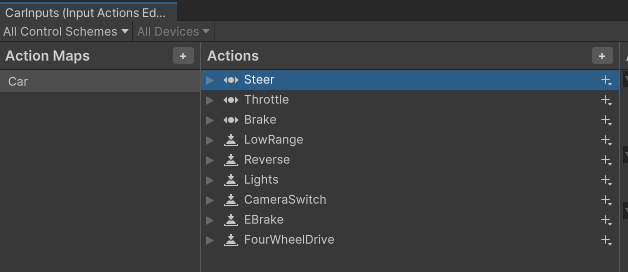
- Right-click in your Project window → Create > Input Actions
- Name it
CarInputs.inputactions - Open the asset and rename the Action Map to Car
- Add these actions with the suggested bindings:
| Action | Type | Suggested Bindings |
|---|---|---|
| Steer | Value / Axis | Left Stick X, A/D keys |
| Throttle | Value / Axis | Right Trigger, W/Up |
| Brake | Value / Axis | Left Trigger, S/Down |
| LowRange | Button | Left Shoulder, Left Shift |
| Reverse | Button | Right Stick Down, R |
| Lights | Button | Y, L |
| CameraSwitch | Button | Right Shoulder, Tab |
| FourWheelDrive | Button | Left Bumper, F |
9. Add PlayerInput to the Vehicle
- Add a PlayerInput component to the VehicleRoot
- Drag your
CarInputs.inputactionsasset into the Actions field - Set Default Map to
Car - Set Behavior to
Invoke Unity EventsorSend Messages
Freelook: The camera controller reads mouse input directly via Unity's built-in Mouse X/Y axes (no input action setup needed). Move the mouse to orbit the camera; it recenters automatically when you drive.
The vehicle auto-discovers the PlayerInput component and reads actions by name. Hit Play and drive.
For code-driven input (testing, AI), add OffroadInputDelegate instead and set steerOverride, throttleOverride, brakeOverride from code.
10. Add Lights (Optional)
Add OffroadLightManager to the root GameObject:
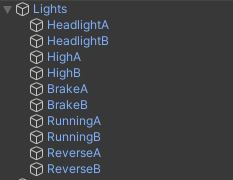
- Create child GameObjects with
Lightcomponents - Assign Headlights, Brake Lights, and Reverse Lights to the respective lists
- Brake lights auto-illuminate when braking
- Reverse lights auto-illuminate in reverse
11. Add Telemetry (Optional)
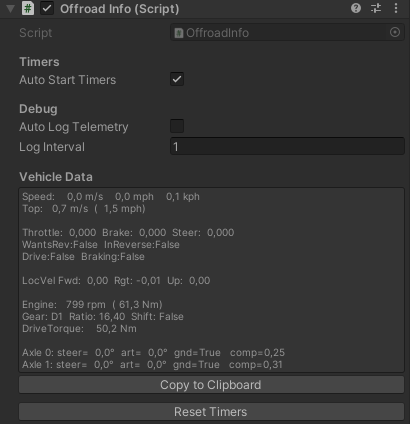
Add OffroadInfo to the root GameObject for a real-time HUD overlay showing RPM, gear, speed, torque, compression, articulation, and drivetrain status. Enable Show Gizmo in the inspector to toggle the display.
12. Static Friction Hold (Banked Slopes)
The Static Friction Hold section on each SolidAxle keeps the vehicle planted on banked surfaces while stationary:
- Coefficient (default 1.8): static grip vs the slope. Holds banks up to roughly
atan(coefficient)— at 1.8 that's ~61°. - Max Slope (default 60°): explicit cap; beyond it the vehicle slides realistically.
- Speed Threshold (default 0.5 m/s): only active when nearly stationary, so crawling behavior is unaffected.
If a vehicle slides sideways while parked on a bank, raise Coefficient or lower Max Slope until it holds — no other grip settings need touching.
13. Standstill Jitter (Stationary Stabilizer)
The Stationary Stabilizer on OffroadVehicle eliminates jitter at 0 speed (velocity damping + a lateral-force deadband on each axle):
- Speed Threshold (0.2 m/s) and Angular Threshold (0.3 rad/s) define the "at rest" envelope
- Grace Time (0.2 s) is the hysteresis — it must be below the thresholds for this long before engaging, so slow crawls never trigger it
- Blend Speed (6) controls how smoothly it engages/releases — no catch, no pop
- Any input (throttle, brake, e-brake, steer) instantly releases it
If you still see micro-sway at rest, raise the Deadband (°) setting under each axle's Tire Curve section.
12. Final Checks
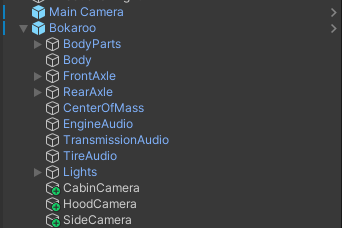
- Verify the Center of Mass position in the Scene view (yellow cross gizmo)
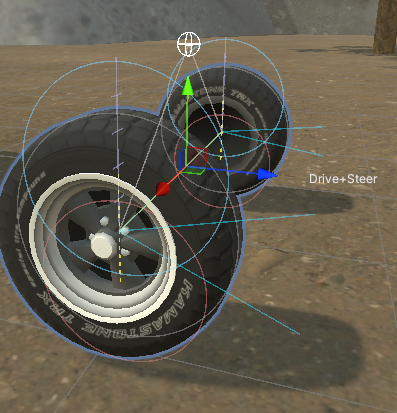
- Check suspension visualization: white center dot, grey axle bar, blue ring (bump stop), red ring (full droop), yellow travel line
- Verify steer cone visualization on steerable axles (blue cone)
- Test drive! Use Max Throttle slider for keyboard-controlled demos
- Enable 4LO for low-range crawling
Manual Setup (Alternative)
If you prefer to set up the hierarchy manually instead of using the wizard:
Hierarchy
VehicleRoot (Rigidbody + OffroadVehicle + OffroadInputSystem)
├── Body (visual mesh with BoxCollider, layer: Ignore Raycast)
├── CenterOfMass (empty Transform, positioned low)
├── FrontAxle (SolidAxle)
│   ├── Wheel_FL (OffroadWheel → Pivot → wheel_visual)
│   └── Wheel_FR (OffroadWheel → Pivot → wheel_visual)
└── RearAxle (SolidAxle)
    ├── Wheel_RL (OffroadWheel → Pivot → wheel_visual)
    └── Wheel_RR (OffroadWheel → Pivot → wheel_visual)
Key Points
- Each SolidAxle is a child of the root, positioned at the axle center height (Y = rideHeight above wheel center)
- Each OffroadWheel is a child of its axle, positioned at the wheel center in world space
- The wheel visual mesh should be under a Pivot transform (child of OffroadWheel) so spin and steer rotations don't interfere with each other
- The Body must be on the Ignore Raycast layer so suspension raycasts can detect the ground through it
Suspension Gizmo Reference
| Color | Element |
|---|---|
| White dot | Axle center position |
| Grey line | Axle bar at rest height |
| Blue ring | Full bump position (max compression) |
| Red ring | Full droop position (max extension) |
| Yellow dotted line | Travel range |
| Blue/white coilover | Spring zigzag visualization |
| Blue cone | Steer angle range (steerable axles) |
Common Tuning Tips
| Issue | Solution |
|---|---|
| Vehicle caps at low speed | Decrease rBody.drag — Unity drag is mass × velocity × drag, overpowers heavy vehicles |
| Vehicle bounces | Increase Damper Rate on SolidAxle |
| Body rolls too much | Increase Spring Rate, lower Ride Height, widen Track Width |
| Not enough traction | Increase Traction Coefficient, switch to Locked diff |
| Won't climb steps | Ensure Travel Up is sufficient (≥0.2m), step detection is active in WheelCast |
| Engine RPM stuck low | Check gear ratios, increase Shift Down RPM so transmission downshifts earlier |
| Upshifts too early | Raise Shift Up RPM |
| Downshifts too late | Raise Shift Down RPM |
| Oversteers on throttle | Switch diff to Open or LimitedSlip, reduce Traction Coefficient on driven axle |
| Understeers | Soften front springs, increase rear spring rate |
| Won't hold on hill | Enable Parking Hold |
| No power in 4LO | 4LO multiplies torque — ensure gear ratios are appropriate for crawling |
| Wheel clips through steps | Increase Travel Up for more bump travel, verify step detection ray is active |
Banked Slopes (Static Friction Hold)
| Issue | Solution |
|---|---|
| Vehicle slides sideways while parked on a bank | Raise Static Friction Hold > Coefficient on both axles, or lower Max Slope |
| Vehicle holds but jitters on the bank | Ensure Static Friction Hold > Speed Threshold is not too low (0.5 default) |
Standstill Jitter (Stationary Stabilizer)
| Issue | Solution |
|---|---|
| Vehicle jitters at complete rest | Ensure Stationary Stabilizer > Enabled is on; raise Speed Threshold slightly if needed |
| Micro-sway persists at rest | Raise Deadband (°) in each axle's Tire Curve section (0.5 default) |
| Stabilizer triggers during slow crawls | Increase Grace Time (0.2s default) to add hysteresis |